How to open the Deadlocks drilldown for a SQL Server connection
- Direct your web browser to https://app.spotlightcloud.io. Sign in with your Quest account.
- Ensure the Monitoring tab is to the front.
- Select a SQL Server connection type. Select the Deadlocks drilldown.
Health checks are not available for Amazon RDS for SQL Server.
Data for deadlock events is gathered using extended events (deadlockList).
Summary panel
Total Deadlocks
The total number of deadlocks raised in the time period.
Overall Lost Time
The total time spent waiting by the victim processes.
Deadlocks chart
This scatter plot shows the time lost to deadlocks over the drilldown period. Each dot represents a deadlock. The horizontal axis spans the drilldown time period. The vertical axis represents lost time where for each deadlock lost time is calculated as the sum of time lost by all victim processes to the deadlock.
Throughput chart
This chart shows the affect the deadlocks have had on throughput by overlaying logins/s and batches/s over the drilldown time period.
Hover the mouse over the chart to see the legend.
Outstanding Deadlock Alarms
Show the number of outstanding alarms of each severity related to the Deadlocks drilldown. Click to open the Alarms panel to drilldown on these alarms. For more information on the time period covered by the drilldown, see time period.
Deadlock Events
This is a table of all deadlock events. Each row represents a process. For a given deadlock, use the arrow at the start of the row to show / hide all processes involved in the deadlock. Identify victim processes with this icon  .
.
For additional actions that can be taken on a row / process, hover the mouse over the row. While the mouse is hovered over the row, the  icon is visible at the end of the row. Right click on this icon for additional actions.
Use  to expand /
  collapse all rows in the table.
Some columns are hidden by default. To show / hide columns use the icon to the right of the search bar  . See Charts and Tables for more information.
For more information on the time period covered by the drilldown, see time period.
Filter the Deadlock Events table
Use the Databases, Programs, Users and Objects menus to filter the Deadlock Events table. The number alongside the menu indicates the number of different values currently found in the table. For example Databases (10) indicates 10 different databases are affected by deadlocks on this table. Click on the menu to see the value list. Select those values you want to show.
You can use the search field to additionally filter the deadlock events table. For example you can use the search field to filter on a specific SPID. In the search field type spid:588 where 588 is the SPID number.
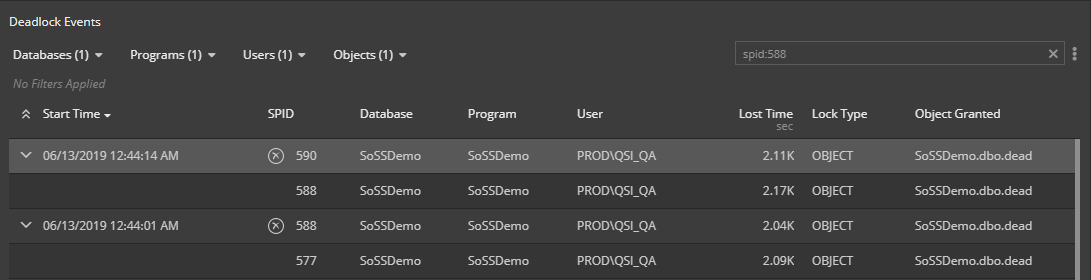
On filtering the deadlock events table Spotlight Cloud will expand condensed rows to show all processes (all rows) that contain the filtered data.
Deadlock Events table columns
Start Time
The time the deadlock was detected by SQL Server and resolved. For your convenience, this time is displayed in your computer’s time zone.
Spotlight collects deadlock data in 5 minute intervals. The table can include a start time up to 5 minutes earlier than the time period selected.
SPID
The server process ID of the user process. This icon is used to represent the victim process .
Database
The database that the process was connected to.
Program
The client application that created the process.
User
The name of the logged in user (as a property of the process).
Lost Time
The number of seconds spent waiting by the victim process. This is based on the process lastTranStarted time.
Lock Type
The type of lock the process requested and has not yet received.
These are the lock types:
| Type | Description |
|---|---|
| RID | Lock on a single row in a table identified by a row identifier (RID). |
| KEY | Lock within an index that protects a range of keys in serializable transactions. |
| PAG | Lock on a data or index page. |
| EXT | Lock on an extent. |
| TAB | Lock on an entire table, including all data and indexes. |
| DB | Lock on a database. |
| FIL | Lock on a database file. |
| APP | Lock on an application-specified resource. |
| MD | Locks on metadata, or catalog information. |
| HBT | Lock on a heap or B-Tree index. This information is incomplete in SQL Server. |
| AU | Lock on an allocation unit. This information is incomplete in SQL Server. |
Object Granted
The session was granted access to this object.
Object Requested
The session was waiting to access this object. If the session was waiting to access more than one object then only the first one is shown.
Show the SQL Statement
- Click on the deadlock row to select it.
- Click the icon at the end of the row.
- Click View SQL text.
The SQL Statement can also be shown as a column within the table. This column is hidden by default. To show the hidden column, use the icon to the right of the search bar . The name of the hidden column is Statement. If the SQL Statement is long then only the first 1024 bytes are shown. Where there are multiple frames only the first one is shown.
Deadlock Events table columns (hidden by default)
To show / hide columns use the icon to the right of the search bar .
The following columns (hidden by default) show Microsoft properties of the process:
- Client Machine (hostname)
- Wait Time
- Log Used
- Deadlock Priority
- Isolation Level
- Last Transaction Start Time
- Lock Timeout
- Wait Resource
- Scheduler ID
- Thread ID (ecid)
- SQL Handle
The following columns (hidden by default) show calculated data:
- Lock Mode Granted - Lock mode for the object granted. Show the first if there are multiple.
- Lock Mode Requested - Lock mode for the object requested. Show the first if there are multiple.
- Sequence - Used internally to order the processes in the Deadlock Events table.